Welding of the remaining few braces at the end posts and gate openings continues but is likely to be finished today. Then there is just one more section of wire to stretch and attach. The last thing to be installed will be the new gates. Before all the gates are done we will have to make a pass through the entire place removing and flushing out the deer. It didn't take them long to figure out to come in to the orchard and eat. It's been over 25 years since they last had access but we counted 11 in one night and I think there may have been more. The dogs have given up and no longer even bark at them much less move them out.
30 November 2007
Fencing Progress Too!
Welding of the remaining few braces at the end posts and gate openings continues but is likely to be finished today. Then there is just one more section of wire to stretch and attach. The last thing to be installed will be the new gates. Before all the gates are done we will have to make a pass through the entire place removing and flushing out the deer. It didn't take them long to figure out to come in to the orchard and eat. It's been over 25 years since they last had access but we counted 11 in one night and I think there may have been more. The dogs have given up and no longer even bark at them much less move them out.
Fast Pace on Shop Construction
The new shop construction is making great strides this week. The second wall went up rapidly on Tuesday.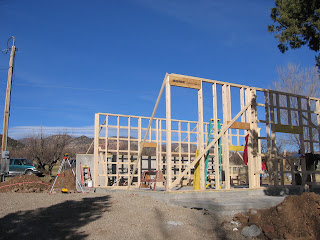
By Wednesday the other walls were up and much of the plywood sheeting was installed.
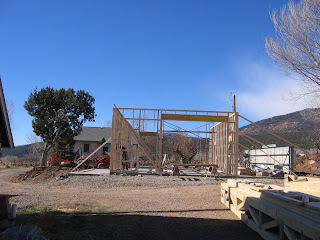
Late Thursday was the start of installing the floor joists for the second floor. That should be completed today.

By Wednesday the other walls were up and much of the plywood sheeting was installed.
Late Thursday was the start of installing the floor joists for the second floor. That should be completed today.
26 November 2007
First Wall Up!
22 November 2007
Monmouth Caps
I've been working on a replica of the Monmouth cap for a while. The only extant original is in the Nelson Museum and can be seen here .
My first attempt was based on several published patterns that are often referenced. One of them is here and the other is here.
 Using our new bulky pure Black Welsh yarn I did the provisional cast on. Knit for a bit then did a purl row then knit again then join the sections at the provisional cast on to make the double brim.
This is my first attempt and while it is a nice hat it doesn't look much like the original.

My second attempt was done more the way I usually knit stuff. I leaped off into the yarn without a pattern at all. I started this version from the top down as to me the brim edge looks like a cast off not a cast on or join. I did a few bits of 3 stitch i-cord to make the button then did a series of increases and knitting plain until it was the right size. For the increases I did a knit in the front then knit in the back of the stitch as that made a better more solid increase and I don't want this to have any holes for cold air to leak in. For each round where I did increases I then did a round of plain knitting to make the hat work properly.
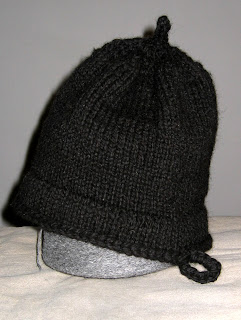
Once the hat was large enough around I knit straight until I was ready to start for the brim. I did an increase in every stitch to double the number of stitches on the hat. Then with help from folks at Taos who showed me how I used the tail end of the yarn so I was knitting from both ends and did double knit for the length of the brim. I'll have to get pictures of how I did it as once I figured out how to carry both front and back yarns in one hand without tangling it went very quickly.
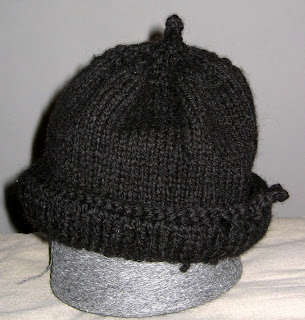
The cast off was done with 2 stitches one from each layer and both yarns at the same time. At the end I did a simple loop chain to make the loop at the bottom of the cap. This version looks a lot closer to the original. Things I liked about doing it this way were that I could start with precious yarn and not waste any. I hate long tail cast on and other yarn wasting methods, probably a result of using my handspun most of the time and the effort to get the yarn made means I don't ever want to cut any off. So starting at the top meant I could knit straight through with no waste yarn. The double knitting went quickly and made a proper looking brim easily and the cast off looks more correct for the bottom than my first version.
Things I am not happy with include the increases on the top and some of the loose ends I haven't finished weaving in. The top increases don't quite match the original, but the picture of the original is poor. I have written to the museum to see if there are any better pictures but none exist. For now this is my best attempt so far on making a fairly accurate Monmouth cap. At least it is from very accurate Black Welsh Mountain sheep wool.
My first attempt was based on several published patterns that are often referenced. One of them is here and the other is here.
This is my first attempt and while it is a nice hat it doesn't look much like the original.
My second attempt was done more the way I usually knit stuff. I leaped off into the yarn without a pattern at all. I started this version from the top down as to me the brim edge looks like a cast off not a cast on or join. I did a few bits of 3 stitch i-cord to make the button then did a series of increases and knitting plain until it was the right size. For the increases I did a knit in the front then knit in the back of the stitch as that made a better more solid increase and I don't want this to have any holes for cold air to leak in. For each round where I did increases I then did a round of plain knitting to make the hat work properly.
Once the hat was large enough around I knit straight until I was ready to start for the brim. I did an increase in every stitch to double the number of stitches on the hat. Then with help from folks at Taos who showed me how I used the tail end of the yarn so I was knitting from both ends and did double knit for the length of the brim. I'll have to get pictures of how I did it as once I figured out how to carry both front and back yarns in one hand without tangling it went very quickly.
The cast off was done with 2 stitches one from each layer and both yarns at the same time. At the end I did a simple loop chain to make the loop at the bottom of the cap. This version looks a lot closer to the original. Things I liked about doing it this way were that I could start with precious yarn and not waste any. I hate long tail cast on and other yarn wasting methods, probably a result of using my handspun most of the time and the effort to get the yarn made means I don't ever want to cut any off. So starting at the top meant I could knit straight through with no waste yarn. The double knitting went quickly and made a proper looking brim easily and the cast off looks more correct for the bottom than my first version.
Things I am not happy with include the increases on the top and some of the loose ends I haven't finished weaving in. The top increases don't quite match the original, but the picture of the original is poor. I have written to the museum to see if there are any better pictures but none exist. For now this is my best attempt so far on making a fairly accurate Monmouth cap. At least it is from very accurate Black Welsh Mountain sheep wool.
New Ditch Section
Our irrigation water enters the property on the north east corner of the orchard. From there we have a concrete ditch box that sends the water either west to irrigate the orchard and front pasture or east to irrigate the back cedars pasture. On the property above ours there is a gate right by where our ditch comes in and the neighbors cattle are always smashing down our ditch and we lose water. One task this winter while the cows are gone is to put in new culvert pipes from the new elk fence up past the gate so the cattle cannot walk where our ditch is. Here Ken is working on where the ditch water will enter the new culverts.
The first attempt leaked around the last joint but Ken got it fixed. The final installation looks great. We won't know for sure how it all works until next summer when full irrigation water is coming down the ditch but for now for winter stock water it's a big improvement.
Elk Fence Wire Up
The first section of new elk fence wire is up and installed. They stretched it from the middle where the 2 rolls that make up this side are spliced together. The high tensile wire can be hard to stretch properly but once it's up it's a wonderful fence.
With all the wire up and stretched the next step is to attach every other horizontal wire to each and every post. All the ties are twisted by hand and it can take a long time to get them all done.
Here is the fence nearly finished. There are only a few more attachments to make.
12 November 2007
More Elk Fence Work
First task was to dig out and measure the slope for everything.
Enos was back on Sunday and in about 2.5 hours he had cleared the entire north fenceline of rocks, put the loose rocks back on the rock wall and leveled the whole line. He is a very skilled equipment operator.
New Loom
As she said, "All those years playing Tetris have finally paid off." She managed to get a Glimakra 4 shaft 60 inch wide countermarche loom into her van for the trip and still had room to spare.
This loom won't fit into any room in the house but will be installed in the upstairs of the new shop when its finally finished. I'm hoping to be able to weave unbalanced twill fabric on it eventually.
More Elk Fence
We're continuing to replace the old DOW elk fence around the orchard. L & S Mountain Fence is doing an excellent job for us. They did the elk fence we put around our front pasture and the lower fence around the back cedars pasture so we could safely put the horses out back in summer. Their first task was to take down the old fence. This section is along the north side of our property.
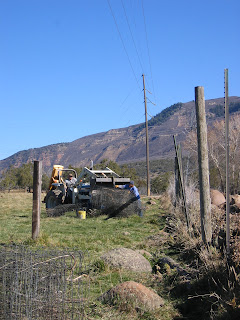
Ours was some of the first DOW fence put in in the North Fork. It was installed in 1981 and has long since passed the use by date. Many of the posts were rotten and the fence was very coyote porous.
We're replacing the section along the road on the inside of the rock wall. This is looking south along the fence line.

With all the old fence out the new corner posts were set and the line pulled to define where the posts will go for the rest of the fence. Here is the new corner post on the upper west corner of the property. We still hadn't cleared all the rocks from the north fence line so Larry continued with the west line. We'll be getting Enos back with the bulldozer to work on the north fenceline as soon as he can come.
With the line set Larry started to drill all the holes for the new fence with his heavy duty post hole digger. It's going to be a wonderful fence when it is finished! Larry got all the line posts set in concrete for the west section and is ready to start welding the braces on.
Ours was some of the first DOW fence put in in the North Fork. It was installed in 1981 and has long since passed the use by date. Many of the posts were rotten and the fence was very coyote porous.
We're replacing the section along the road on the inside of the rock wall. This is looking south along the fence line.
With all the old fence out the new corner posts were set and the line pulled to define where the posts will go for the rest of the fence.
With the line set Larry started to drill all the holes for the new fence with his heavy duty post hole digger. It's going to be a wonderful fence when it is finished!
05 November 2007
Shop Construction
Off to Slaughter
It's fall and this year I vowed not to go into winter with as many sheep as I had last year. So our fall slaughtering has started. We've already done 16 adult ewes and today was 10 young rams.

We have to schedule slaughter dates over a year in advance and I have 66 slots this fall. I can always call a couple of weeks before the date and cancel a few but there is no way to add a few sheep to a slaughter date or get another date if I have more sheep ready to go than I planned on. I have already had to schedule my 2008 and 2009 slaughter dates. This can be a real problem, not only do I have to estimate how many sheep I will have to slaughter but I have to do it before we've even put rams in with the ewes and way before I know how lambing has gone. I've been caught before with more sheep than I can get killed and so this year I decided to make sure I had plenty of dates.
Our slaughter protocol starts at a minimum 3 weeks before the scheduled date. First step is deciding who is on the butcher list. Rams that butt us, ewes that have failed to care for lambs, have no more teeth or other similar problems are on the list. I also cull out to the freezer the lower ranking lambs. My goal is that the keepers of the ram lambs are all in the top 25% so I have 75% of the ram lambs born that are scheduled to be dinner. For ewes I try to select keepers (which for us also includes all for sale animals) from the top 50%. This year we produced 88 lambs, 49 ram lambs and 39 ewe lambs. So right off the bat I have to select about 37 rams and 20 ewes to butcher. That doesn't leave us many slots for old ewes so we'll end up with a few spare dinner sheep over winter.
Once the sheep are on the list we have many things we do to ensure that they produce good tasty meat with as little stress as we can manage. Our sheep are forage (grass and hay) finished. That means no grain. While this is more natural and produces wonderful healthy meat it does mean there is no excess glycogen in the muscles of the slaughter sheep. Muscle glycogen stores are what affect the Ph of the muscle at slaughter and the Ph and the subsequent changes in Ph as meat ages are what affects tenderness and taste. Grain fed animals have excess glycogen stored in their muscles. Under stress the glycogen of the muscles is used to combat the stress. We have no cushion that a grain fed animal would have so we need to do more to ensure that our animals are not stressed. Through experience we have learned that 15 minutes of really high stress will ruin the meat. And the bad effects from a significant stress situation will take 2 weeks to clear out of the muscles.
To reduce stress all butcher sheep are kept togther in sex segregated pens starting about 3 weeks before their slaughter date. So rams will be kept with rams and ewes with ewes. We keep all the slaughter sheep together so that they are with their buddies. One huge stress for animals is to have to deal with strangers so we make sure there are no strangers in the butcher pens.
Keeping the sheep in small pens means they are more used to us being near them so the stress of human contact is also minimized. We feed as high a legume feed as we have during the last 3 weeks. Legumes produce more muscle glycogen so a high legume diet is better for loading the muscles with glycogen.
We load the sheep into the trailer the night before so that the minimal stress of loading has several hours to wear off. We also keep feed and water in front of the sheep right until they walk off the trailer into the kill pens. Most slaughter houses want the animals to be off feed and water for 24 hours but for our forage finished sheep that would ruin the meat and stress the animals. We are fortunate to have a butcher willing to take the extra time it takes to properly prepare sheep who have full rumens. It's possible but does take more time and many places will not do it.
Finally, based on research data from both France and Finland on glycogen stores in the muscle of grass finished cattle we have added an additional insurance policy. Just before we pull out of the driveway we give each and every sheep about 10cc per 50 pounds body weight of a mixture of 50% propylene glycol and 50% molasses. Propylene glycol is a food additive for ruminants. It provides a quick dose of glycogen that gets into the muscles within 15 minutes of administering. It's often used to treat pregnancy toxemia or when sheep go off feed. Molasses makes the mixture good tasting and ensures the sheep will eat it. We found that this gives us about an hour and a half to get the sheep to the slaughterhouse and killed before they are using up their own muscle glycogen.
Once there we slowly and easily unload the sheep and get them into the pen. The butcher has worked with us to make sure our sheep are killed first so as not to run out of muscle glycogen.
This process is very labor intensive but we feel it produces the best meat we can and minimizes the stress our dinner sheep feel.
We are proud to provide tasty meat and also proud that we take care to make sure our precious sheep perform their function with as little stress as we can manage.
Labels:
animal welfare,
cost of food,
local food,
sheep management
03 November 2007
Shop Building
During the pour it took a bit of effort to work the concrete trucks around the cedar tree we are trying to save in the front of the building.
This section of concrete work is done. Next is to backfill the foundation, compact it and get ready to pour the slabs. The carport, covered porch and main building will all have concrete floors. It will be a really nice shop when it's finished.
Subscribe to:
Posts (Atom)


